You are using an out of date browser. It may not display this or other websites correctly.
You should upgrade or use an alternative browser.
You should upgrade or use an alternative browser.
What did you do in the 'workshop' today
- Thread starter Pete D
- Start date

Help Support Beekeeping & Apiculture Forum:
This site may earn a commission from merchant affiliate
links, including eBay, Amazon, and others.
- Joined
- Sep 4, 2011
- Messages
- 6,370
- Reaction score
- 6,134
- Location
- Wiveliscombe
- Hive Type
- National
- Number of Hives
- 24
Got most of the new bee shed floor done today. Just need to fix down the last few boards, but I've run out of steam for now.
Once the floor is done I'm mostly freestyling. The old shed that I've dismantled to re-use is 8'x6', but I've built the floor to be 8'x10'. Some of that will be external covered storage for hive boxes etc., but I'm toying with the idea of extending the shed to be 8'x7' or even 8'x8'6" so there's more storage space inside (I have this vague idea about building a rack for storing QXes, clearer boards and suchlike as well as some space for frames whilst they're being assembled.
James
Hachi
Queen Bee
- Joined
- Mar 28, 2012
- Messages
- 2,373
- Reaction score
- 619
- Location
- Wiltshire
- Hive Type
- Commercial
- Number of Hives
- Damn! A lot more than I ever thought I'd have
I have small pallets on the floor in the barn and your idea of a kind of pigeon hole shelving is a bobby dazzler of a space saving thought. Thanks
- Joined
- Jul 23, 2009
- Messages
- 37,005
- Reaction score
- 17,695
- Location
- Ceredigion
- Hive Type
- 14x12
- Number of Hives
- 6
I’m watching some folk making tables on channel 4; an amazing array of woodworking tools!
- Joined
- Sep 4, 2011
- Messages
- 6,370
- Reaction score
- 6,134
- Location
- Wiveliscombe
- Hive Type
- National
- Number of Hives
- 24
I have small pallets on the floor in the barn and your idea of a kind of pigeon hole shelving is a bobby dazzler of a space saving thought. Thanks
At present I think it makes sense for me because the lack of space has meant I've always ended up stacking unused crownboards on top of QXes on top of clearers and so on. Then when I want the clearers I have to find space to move everything else into so I can get at them. Or I want multiple items to make up a complete new hive from various places in the stack. By the time I have enough that I may need a different solution, I'll probably need a bigger bee shed anyhow
James
- Joined
- Sep 4, 2011
- Messages
- 6,370
- Reaction score
- 6,134
- Location
- Wiveliscombe
- Hive Type
- National
- Number of Hives
- 24
I’m watching some folk making tables on channel 4; an amazing array of woodworking tools!
It is astonishing how woodwork tools seem to breed. There are so many different types and sizes of plane, chisel, clamp, saw and who knows what else. It's amazing that anyone actually finds time to make anything.
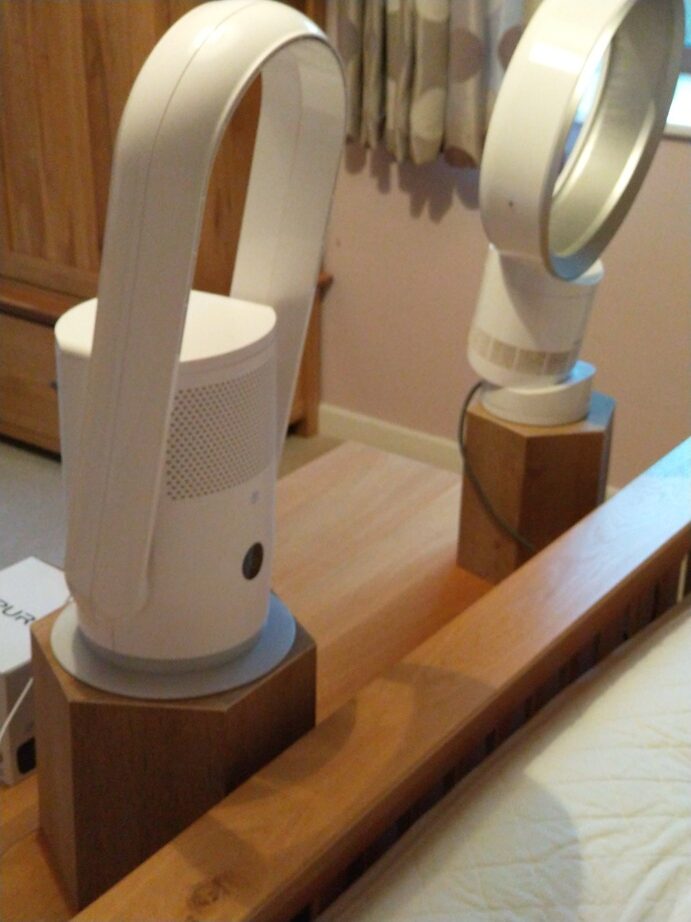
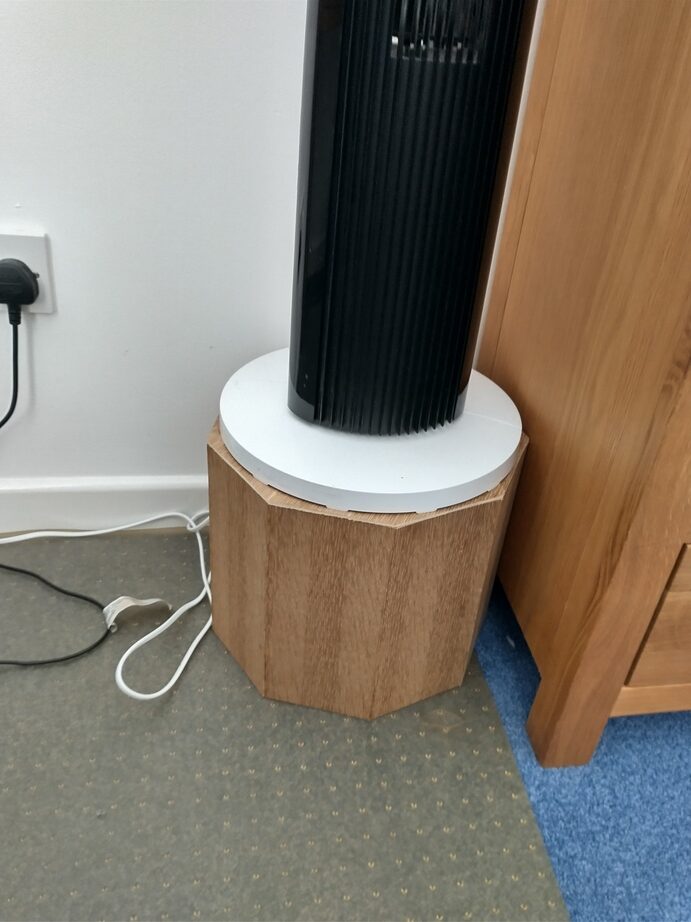
A couple of weeks back my wife insisted that we needed some stands to raise the height of our fans. I still had a bit of a bee thing going on in my head having just been extracting (and in fact I just couldn't face making a boring box shape), so I made these from some scrap oak-faced ply that I had:

I ended up using all twelve of my spring clamps at the same time and actually could have done with more. I now have a rack of eighteen of them in the workshop because my son then challenged me to make a nine-sided one for him:

The clamps will always come in useful, so I'm happy to have them, but they do look a bit ridiculous hanging in a long row on the wall.
James

£13.66
Cut Comb Honey Containers Honey Cut with 10Pcs Plastic Box Stainless Steel Cut Comb Honey Containers Beautiful and Practical Beekeeping Tools for Cutting Nesting Honey, Putting Comb Honey
JianShiXianQingGeFanShangMaoYouXianGongSi

£9.76 (£30.89 / kg)
Uxsjakjsd Honey Fork, Honey Shovel, Honey Extraction and Harvesting, Multi-Toothed Honeycomb Planer, Beekeeper Tool
Longbagu

£9.23 (£23.08 / kg)
Pyatofy Honey Harvesting Equipment, Beekeeping Scraper Tool, Beekeeper Flat Honey Shelf for Hive Cleaning Tool
weituochendianzi

£15.59
£25.00
The Bee Manual: The Complete Step-by-Step Guide to Keeping Bees (New Ed)
⭐ Lowplex Books® ⭐

£15.29
£19.99
The Bee Book: The Wonder of Bees – How to Protect them – Beekeeping Know-how
Amazon.co.uk

£11.97 (£2.39 / count)
5pcs Bee Hive Entrance Entrance Gate Anti-Scape Door Beekeeping Tool Equipment
Herexty

£7.88 (£23.73 / kg)
Faeymth Bee Honey Faucet Gate Valve, Extractor Bottling, Honey Extraction Machine, Beehive Equipment Beekeeping Tools
LiuHabQing
- Joined
- Mar 30, 2011
- Messages
- 37,914
- Reaction score
- 18,652
- Location
- Glanaman,Carmarthenshire,Wales
- Hive Type
- National
- Number of Hives
- Too many - but not nearly enough
I was gutted when my next door neighbour died, he had a collection of about two dozen or more sash cramps of various lengths, which only I ever used, his widow just cleared the lot off to some random person, although I manage with my small collection of shorter cramps, the longer ones certainly came in handy when I was making new shutters for the old chapel.
- Joined
- Sep 4, 2011
- Messages
- 6,370
- Reaction score
- 6,134
- Location
- Wiveliscombe
- Hive Type
- National
- Number of Hives
- 24
The floor for the new bee shed is complete and I've repaired and reassembled most of the old shed parts other than the roof. I still have to work out how exactly I'm going to make the increase in size work, but I've decided I'm only going to go to 8'x7' to allow more room for covered brood/super storage outside. It's too late to go back now anyhow, as I've cut the height of one wall down to allow the extra roof section to slope.
James
James
- Joined
- Jan 18, 2021
- Messages
- 2,306
- Reaction score
- 2,179
A while ago, I put a strengthening bead in this sheet of galvanised steel, drilled it to fit the existing holes on a scrap, steel pole which used to be part of a swinging seat, and then painted it matt white.
Today, I finally got round to putting on the writing. I printed it out from a Microsoft font called "Modern Love" enlarged to about 400 point. Then traced it onto the sign, used my yellow, queen-marking pen for the yellow and outlined with the Sharpie pen that I use for marking frames.
a coat of clear sealer and then let the sales begin.

Today, I finally got round to putting on the writing. I printed it out from a Microsoft font called "Modern Love"
a coat of clear sealer and then let the sales begin.
Attachments
Last edited:
JimBee463
House Bee
- Joined
- Apr 25, 2022
- Messages
- 134
- Reaction score
- 109
- Location
- East Devon
- Hive Type
- National
- Number of Hives
- 1
I started making up a woodpecker frame for my hive. Just need to attach the netting to it and it will just drop over the top of the hive, and will be easily removed if I need to get in there for any reason. I'll attach pics once it's finished
- Joined
- Jan 1, 2018
- Messages
- 5,216
- Reaction score
- 5,174
- Location
- Fernhurst Sussex
- Hive Type
- National
- Number of Hives
- 40 plus 23 that I maintain for clients.
- Joined
- Sep 13, 2011
- Messages
- 1,267
- Reaction score
- 1,364
- Location
- Somerset
- Hive Type
- Other
- Number of Hives
- 7
Have been meaning to electrify my 9 frame radial extractor to cut down on the handle turning as I seem to have developed tennis elbow recently. I sought some advice and was told not to use the traditional electric drill as the load is high and they burn out easily. However the keyless chuck models do not allow "freewheeling" when the power goes off so thought that this might be solved using a shaft connector as shown in the photos. The extractor shaft is 15mm and the steel rod held in the drill chuck is 10mm (maximum) so you need the correct measurements for the connector. The connector was about £9 . The drill was in the recent promotion in Aldi and is a hammer drill used in the screwdriver option or drill (non hammer) option. It was only £19.99 and comes with a battery so I bought two. I think it's 12 or 14Volt . Be warned though as the higher voltage model does NOT come with a battery and the Aldi floor person told me helpfully that they hardly ever get them in stock and they are about £35 + the base unit. I have run it in the slow mode. What I have done is to get it up to the speed you want then run it, then steady until you want to stop then just pull/slide the drill off the shaft with the elastomer spider left in one of the claws. Do NOT just stop the drill when it is still attached to the shaft. Just push it together when you want to start again with everything stopped. Have not run it in anger fully loaded yet but looking forward to next year's harvest. Hope this all makes sense.
Attachments
- Joined
- Sep 4, 2011
- Messages
- 6,370
- Reaction score
- 6,134
- Location
- Wiveliscombe
- Hive Type
- National
- Number of Hives
- 24
Regarding batteries etc., for what it's worth the drill in the photos looks near identical to ones sold by Screwfix/B&Q with Titan/Erbauer/Macallister brand tools (possibly also sold as Worx and Guild?). I suspect they all come out of the same factory in China with slightly different specifications and small changes to the mouldings. The brands aren't all the same voltage and batteries appear to be designed to be non-interchangeable even when they are (by having slightly different keyways moulded into the battery), but even though the brand-specific chargers are usually fixed voltage there are voltage sensing chargers available on that Ebay that appear to work with them all. The charger for my Titan cordless drill died recently which irritated me as the drill has been completely reliable despite fairly heavy use for a low-end tool. I bought an Erbauer charger (from Ebay as far as I recall) that works perfectly with the batteries for both my Titan and my father-in-law's Macallister drill even though neither battery will fit the other drill.
James
James
- Joined
- Sep 13, 2011
- Messages
- 1,267
- Reaction score
- 1,364
- Location
- Somerset
- Hive Type
- Other
- Number of Hives
- 7
This drill is given the name Ferrox. I had a less powerful one from Aldi called a Workzone years ago which has been great but is a bit grumbly now but still servicable. The battery still charges well. It owes me nothing.Regarding batteries etc., for what it's worth the drill in the photos looks near identical to ones sold by Screwfix/B&Q with Titan/Erbauer/Macallister brand tools (possibly also sold as Worx and Guild?). I suspect they all come out of the same factory in China with slightly different specifications and small changes to the mouldings. The brands aren't all the same voltage and batteries appear to be designed to be non-interchangeable even when they are (by having slightly different keyways moulded into the battery), but even though the brand-specific chargers are usually fixed voltage there are voltage sensing chargers available on that Ebay that appear to work with them all. The charger for my Titan cordless drill died recently which irritated me as the drill has been completely reliable despite fairly heavy use for a low-end tool. I bought an Erbauer charger (from Ebay as far as I recall) that works perfectly with the batteries for both my Titan and my father-in-law's Macallister drill even though neither battery will fit the other drill.
James
- Joined
- May 24, 2020
- Messages
- 2,860
- Reaction score
- 3,580
- Location
- Hampshire
- Hive Type
- National
- Number of Hives
- 20-ish
Not quite bee related but proper roof finally sorted for the hens and sort of in place... Thank goodness for pulleys as did the whole thing solo. Fine tuning of posts can wait a few days.
Run space reduced to the end of this roof thing as I'm drawing a line on how much to spend on bird flu controls.

Run space reduced to the end of this roof thing as I'm drawing a line on how much to spend on bird flu controls.

- Joined
- Jul 23, 2009
- Messages
- 37,005
- Reaction score
- 17,695
- Location
- Ceredigion
- Hive Type
- 14x12
- Number of Hives
- 6
Great jobNot quite bee related but proper roof finally sorted for the hens and sort of in place... Thank goodness for pulleys as did the whole thing solo. Fine tuning of posts can wait a few days.
Run space reduced to the end of this roof thing as I'm drawing a line on how much to spend on bird flu controls.
View attachment 34362
No restrictions in Wales .....yet
- Joined
- May 24, 2020
- Messages
- 2,860
- Reaction score
- 3,580
- Location
- Hampshire
- Hive Type
- National
- Number of Hives
- 20-ish
Intriguing.Great job
No restrictions in Wales .....yet
- Joined
- Feb 8, 2019
- Messages
- 1,495
- Reaction score
- 1,281
- Location
- Kingdom of Herefordshire
- Hive Type
- National
Before I bought my current one I considered a manual extractor with a view to drill power.I have a core drill that Ive only ever used three times and It probably would have been ideal as it can run high torque low rpm loads.Have been meaning to electrify my 9 frame radial extractor to cut down on the handle turning as I seem to have developed tennis elbow recently. I sought some advice and was told not to use the traditional electric drill as the load is high and they burn out easily. However the keyless chuck models do not allow "freewheeling" when the power goes off so thought that this might be solved using a shaft connector as shown in the photos. The extractor shaft is 15mm and the steel rod held in the drill chuck is 10mm (maximum) so you need the correct measurements for the connector. The connector was about £9 . The drill was in the recent promotion in Aldi and is a hammer drill used in the screwdriver option or drill (non hammer) option. It was only £19.99 and comes with a battery so I bought two. I think it's 12 or 14Volt . Be warned though as the higher voltage model does NOT come with a battery and the Aldi floor person told me helpfully that they hardly ever get them in stock and they are about £35 + the base unit. I have run it in the slow mode. What I have done is to get it up to the speed you want then run it, then steady until you want to stop then just pull/slide the drill off the shaft with the elastomer spider left in one of the claws. Do NOT just stop the drill when it is still attached to the shaft. Just push it together when you want to start again with everything stopped. Have not run it in anger fully loaded yet but looking forward to next year's harvest. Hope this all makes sense.
In the end it was a lot of faff when I needed the kit quickly so I stumped up for ready made
Pembroke
House Bee
- Joined
- May 11, 2019
- Messages
- 375
- Reaction score
- 218
- Location
- Carmarthen
- Hive Type
- Commercial
- Number of Hives
- None
Great job
No restrictions in Wales .....yet
Sorry, there are now:
https://gov.wales/all-wales-avian-influenza-prevention-zone
- Joined
- Jul 23, 2009
- Messages
- 37,005
- Reaction score
- 17,695
- Location
- Ceredigion
- Hive Type
- 14x12
- Number of Hives
- 6
Doesn’t say anywhere small flocks ( I have three hens) have to be fenced in an enclosed run or have I missed something?
Similar threads
- Replies
- 15
- Views
- 983


