Wallpaper steam wax melter

Beekeeping & Apiculture Forum

Help Support Beekeeping & Apiculture Forum:

This site may earn a commission from merchant affiliate links, including eBay, Amazon, and others.

ugcheleuce

Field Bee
Joined
Apr 15, 2013
Messages
669
Reaction score
1
Location
Apeldoorn, Netherlands
Hive Type
National
Number of Hives
7-10
Hello everyone

Normally, when I have very little wax to melt, I simply use the kitchen stove, but I've recently obtained about 250 one-year-old frames with drawn-out comb that I would like to clean out of wax efficiently (the foundation used in them was "contaminated" with about 5-10% paraffin wax, so the original beekeeper did not want them, but I can make candles, right?).

Has anyone here ever built a steam wax melter that uses a wallpaper steamer? What are your experiences? What tips can you offer?

I created a test model yesterday by attaching a metal queen excluder to the lug rail of a super, and then turning that super upside down and placing another super on top of it, and using a crown board with a hole in it that's big enough for the steamer pipe, and an eked board at the bottom with one corner sawn off, for the wax to pour out.

c0L0Li2.jpg


dIIAoni.jpg


https://youtu.be/IWt6feK_FVo

https://youtu.be/SJgVy6H_0Ig

It worked all right, but obviously there were lessons learnt.

1. The crown board buckled quite quickly, so I need to make sure I use stiff wood. It may also be a good idea to use multiple straps to keep everything tight.
2. Steam escaped from between the supers, so it may be best to build a custom box instead of using two supers. Unfortunately I don't have bigger hive bodies available.
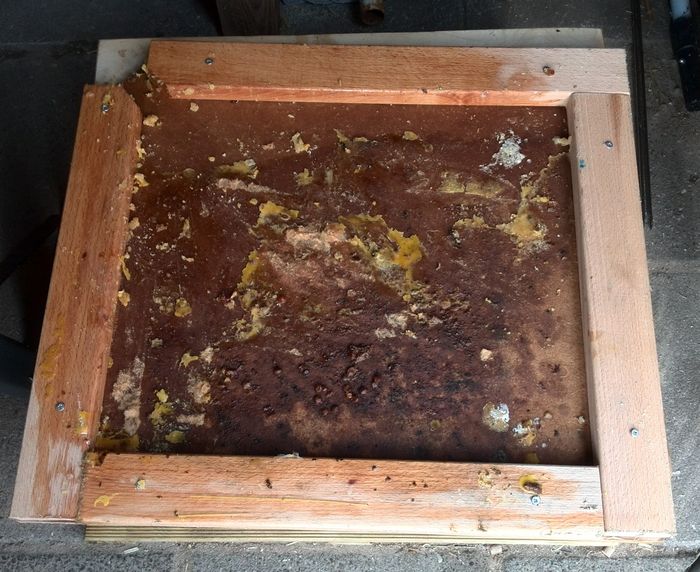
3. The bottom board was MDF, and I suspect little bits of it came off during the steaming. I damaged it further when I tried to scrape wax off it.
4. A lot of wax solidified on the bottom board before it ran out of the melter. Perhaps if less steam escapes, it will be hotter at the bottom. Or perhaps I should line the bottom board with e.g. tin foil.

This morning, I expected the wax in the bucket to have solidified into a single mass floating on top of the water, but a lot of wax particles are still separate tiny beads.

It's quite easy to scrape the frames clean after they've been in the steamer, but I find that the frames cool off too quickly after the steamer's lid was removed. I can clean only 4-5 frames before the wax and propolis settles again. And you can't keep the steamer running while the lid is off, because it produces a lot of steam. And it takes a few minutes for the steamer to wake up again after stopping it.

This lead me to thinking that I should make two steam boxes, of e.g. 6-7 frames each, but only one lid, so that the one box can steam while I properly clean the frames in the other box. This will allow me to keep the steamer running constantly but still allow me to access frames to scrape clean. This will also allow me to clean the bottom board while the steamer is busy steaming frames in the bother box.

I'm not sure what material I should use for these boxes. It has to be cheap and should have the capacity to deal with steam. I'm considering making the boxes from tongue-and-groove floor board planks, with very thick corners.

Your thoughts?

Samuel
 
Never had experience so probably talking rubbish. I would suggest the boxes would be better made of solid wood not composite (ply , MDF etc ), and may benefit from insulation. Also most I have read about have a metal tray in the bottom for the gunge to drip onto, with a lip to run it into the bucket.
Have not tried it because I have read that they are slow and as you have experienced, hard work.
I use a home made solar wax melter. Ok, I have to do all my frame recycling in the summer, but I just bung it in and leave it, and about two hours later, it is ready for the next lot. I built in a coarse and fine filter, so the collected wax is nice and clean. I soak the block in cold water to dissolve off any honey remnants, and it is all ready for trading in for fresh foundation. Much easier, so little input from me.
Some of the frames I need to boil in an old tea urn, with washing soda, but again bung them in and leave five mins, rinse them off and let dry and ready for re-use.
I use a lot of recycled pallet wood for my DIY bee stuff.
Thinking about it, I modified a polystyrene fish box ( scrounged from local fish monger) for my solar wax melter. The boxes come with a lid. Drill a whole in the top for your steam input, a hole in the bottom, perhaps on a corner, and you have your wax melter
 
Last edited:
Have not tried it because I have read that they are slow and as you have experienced, hard work.

Well, I'm not sure if they are slow. After adding boiled water to the wallpaper steamer, it takes about 10 minutes before it produces masses of steam, but from then on it steams like crazy, for an hour or more.

Melting wax is always kinda slow, so if you add new frames to the steamer, you're obviously going to have to wait about 5 minutes before you see more wax dripping out.

I'm not sure if it is hard work. It's a case of popping in the frames, then doing something else for half an hour, and then coming back.

I have seen videos of people filtering the wax straight out of the steamer, but since the temperature outside the steamer is not really hot enough to keep the wax melting, you have to add extra heat, and the way to do that is to use a heat gun to apply steady heat to the filters (assuming of course that they are metal).

The metal tray is a good idea, but I'm not sure where I would be able to get one.

Some store bought steam wax melters have filters inside the box (and I have seem some videos on Youtube where people put the filters and the bucket all inside the box), but that makes for a very large box, which in turn requires a lot of steam.
 
I did almost the same as you this week, I lined the floor with silver foil and shaped a lip to pour out. Seemed ok to me. Half hour for a brood box of frames. Once the frames are dry I'm taking them apart and scraping the odd bits that are left off.

It is definitely a slow process after the wax is off.
 
Hi Sam.

Firstly, you need a small hole to let the steam escape otherwise the pressure builds up and the actual temperature of the steam will be higher (Think pressure cooker !). It will warp timber if it gets too hot and wet at the same time and anything like MDF will dissolve as the glue sticking the particles together disintegrates with heat and moisture.

I made mine out of Celotex/Kingspan insulation board - stands the heat and moisture much better than timber. I use it as a solar wax melter in the summer and a steam melter when there's no sun. Glass lid in summer and a timber one with a small hole in it when it's used as a steamer. The steamer hose comes in underneath the sloping aluminium sheet.

The frames take minutes to melt all the gunge off and the wax flows down the aluminium sheet and into a polythene tub - filltered through a J-cloth on the way.

There was a thread not so long ago here to save me reposting the photos.

http://www.beekeepingforum.co.uk/showthread.php?t=38867 #Post 7
 
Last edited:
I once tried using a wallpaper stripper as a heat source for melting wax during winter - not very successfully. Not only did the timber warp badly, but when run outside, the wax solidified in the delivery trough. When run inside it didn't - but generating large quantities of steam in a workshop isn't such a bright idea.

For winter extraction indoors, consider using a heat gun. For summer extraction, a solar melter.
LJ
 
I use old brood box with celtex lid. Bottom tray made out of q excluder on top of alloy tray. Excess steam comes out of lip on that tray keeping it warm. It can solidify at that point to start with till it all warms up. Melted wax runs into bowl of water where clean wax floats to top leaves any excess detritus at bottom of water bowl.
Works well. Don't use when bees are flying if bees can smell melting wax or you will get hundreds flying in to see what is happening. Ended up with shed full of bees first time!
 
I'm considering making the boxes from tongue-and-groove floor board planks, with very thick corners.

I couldn't get to the store today, but I had an idea: I have polystyrene 6-frame hives with 6-frame supers -- why not use that?

https://youtu.be/4lr2uYStMFo

The 6-frame hive has a small varroa floor, which I covered with duct tape on the inside. I also added an old piece of varroa mesh (instead of a metal queen excluder) to raise the gunk from the hive floor, and put little planks on the inside of the hive for the mesh to rest on.

Even after strapping down the hive parts, steam still escaped at the lid, until I added strips of old towel.

In the video you'll see lots of liquid running out, but that is sugar syrup that was released when the wax melted.

The steam is HOT HOT HOT, so one has to be careful when removing the lid. However, the smaller design made it possible for me to remove the lid without switching off the steamer, so that saved time. I get the impression that the small box also gets a lot warmer. With the previous design, when most of the wax is melted, I still needed to use my hive tool to scrape off the last bit of pupae shells from the wood, but with this new design I can simply bang the hot frame against the top of the box, and all the gunk falls right off.

I had to drill a hole in the top of my poly hive, and the hole wasn't as neat as the one drilled in the wooden roof, but I was able to make the pipe fit snugly by wrapping some towel strips around the nozzle. I'm going to have to think how to fix that ugly looking hole in the poly roof, though.
 

Attachments

  • wax melter III.jpg
    wax melter III.jpg
    67.5 KB · Views: 43
The fluid running out will be mainly condensed water mixed with honey residue. Allot of water comes from the steam.
E
 
Use nothing else & it works a treat. Renders all my wax
Takes about 12-15 min for the wax to start flowing and 30 min before it's done.
My set up is
Old solid floor
Aluminium tray- pictiure shows the lip on the tray to allow wax to flow out
Varroa mesh to support wax/frames etc
brood box
crown board with hole in center for the end of the steam tube
ratchet straps x2 to hold everything together.
Incline the setup froward by 30 degrees to allow wax to quickly flow out

itouch 506.jpg
 
The fluid running out will be mainly condensed water mixed with honey residue. A lot of water comes from the steam.

Yes, that's what I figured as well. I had initially thought it would be better to use a honey extractor to empty the frames of sugar syrup, but at this time I don't even think that that is necessary. In my case, many of the frames have winter feed stored in them.

I did another three batches this morning. This time, I put 12 honey frames (simplex frames, same size as British National) into the steamer at a time. On average, I get 1 kg of wax from 12 honey frames.

I found out that when there is still wax in the steamer, hardly any steam escapes, but as soon as all the wax is melted, steam starts billowing out the drain hole. I think this also fits the facts: honey absorbs a lot of heat, but wood and pupae casings don't.

Also (and this is also logical), when using only honey frames that never had any brood in them, there is almost no gunk on the grille. And of course the wax is whiter.

Today I killed two curious bees. Sorry, but I couldn't afford them flying back to their mates and telling them about their find. I was fortunate the past few days were quite rainy (I work under a tarp in the back yard), but today the sun came out long enough for bees to fly.

Takes about 12-15 min for the wax to start flowing and 30 min before it's done.
... Varroa mesh to support wax/frames etc.

That's about what I found with the 11-frame box also. But with the 6-frame box (even if I double up to 12 frames), the wax starts flowing within a minute when I put new frames in (note: I now keep the steamer going -- simply pop off the lid, remove the old frames, put in the new frames, and pop the lid back on). I wonder if brood frames will take much longer to do than honey frames.

I notice many people drip the wax into a shallow pan, but since my frames still contain syrup, I have to use a deep bucket, to catch all the syrup in addition to the wax.

I use varroa mesh in the 6-frame version (simply because I did not have a 6-frame queen excluder). I'm not sure if the varroa mesh will become clogged quicker if I start melting down brood frames.
 
Last edited:
My top tip - put your frames and wax into an old pillow case. That way the wax is filtered through the cloth and you can easily remove the gunk once you've finished steaming.
 
My top tip, put the steam inlet pipe in the bottom of the box near the wax outlet. Keeps the whole thing running smoothly. Steam rises when all said and done! Keeps the outlet hot too.
E
 

Latest posts

Back
Top